Saturday 22 June 2019

Installing Arduino IDE on Linux

https://askubuntu.com/questions/786367/setting-up-arduino-uno-ide-on-ubuntu

I found I couldn't download over serial port Blink example to NodeMCU

kilnageer@kilnageer-Inspiron-3537:~$ dmesg | grep tty
[    0.000000] console [tty0] enabled
[ 9640.093642] usb 1-1.4: ch341-uart converter now attached to ttyUSB0
[10666.992832] ch341-uart ttyUSB0: ch341-uart converter now disconnected from ttyUSB0


[10668.867323] usb 1-1.4: ch341-uart converter now attached to ttyUSB0
kilnageer@kilnageer-Inspiron-3537:~$ sudo adduser kilnageer dialout

Then logged out as Kilnageer and back in. Download then worked.

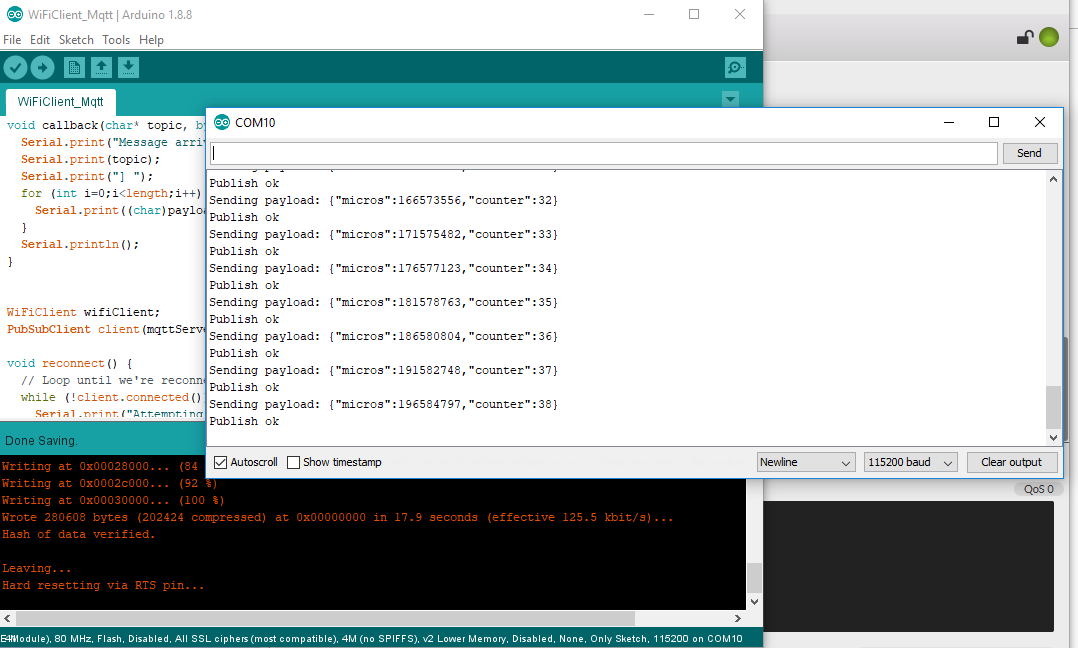
Had to include libraries PubSubClient for MQTT and adafruit unified sensor


https://lastminuteengineers.com/esp8266-dht11-dht22-web-server-tutorial/


http://www.steves-internet-guide.com/install-mosquitto-linux/

Installing The Mosquitto Broker

The download links and install directions for Linux are here.
I followed the install instructions for Ubuntu but they seemed to miss a few important steps. Here are the steps I used.
  • sudo apt-add-repository ppa:mosquitto-dev/mosquitto-ppa
  • sudo apt-get update
  • sudo apt-get install mosquitto
  • sudo apt-get install mosquitto-clients 

kilnageer@kilnageer-Inspiron-3537:~$ mosquitto_sub -h 192.168.1.100 -t \esp8266_2_arduino_out
{"micros":22966832,"counter":4}
{"micros":28040128,"counter":5}


Trouble with DHT22 though DHT11 works. May use code here to investigate:
https://www.keuwl.com/electronics/rduino/bluet/08-dht11/

Rather than Adafruit uni sensor library for DHTXX.

Also .cpp code available from here:
https://www.instructables.com/id/How-to-interface-Humidity-and-Temperature-DTH11-Se/
https://drive.google.com/file/d/0B1paTI5fzcHodno5azFOSVVDT0E/view?usp=sharing


Saturday 15 June 2019

Installing Arduino IDE on Ubuntu Linux laptop

I went to https://www.arduino.cc/en/Main/Software

and then clicked on the Linux 64-bit download link

I then saved the arduino-1.8.9-linux64.tar.xz file to my downloads directory

kilnageer@kilnageer-Inspiron-3537:~/Downloads/arduino-1.8.9$ sudo ./install.sh
(which will set up a menu item for Arduino, etc.)

Can now see "Arduino IDE" under "Programming" menu item.

But it doesn't do anything..
Trying manually..
kilnageer@kilnageer-Inspiron-3537:~/Downloads/arduino-1.8.9$ ./arduino
./arduino: line 35: /home/kilnageer/Downloads/arduino-1.8.9/java/bin/java: cannot execute binary file: Exec format error

kilnageer@kilnageer-Inspiron-3537:~/Downloads/arduino-1.8.9$ java -version
openjdk version "11.0.3" 2019-04-16
OpenJDK Runtime Environment (build 11.0.3+7-Ubuntu-1ubuntu218.04.1)
OpenJDK Server VM (build 11.0.3+7-Ubuntu-1ubuntu218.04.1, mixed mode, sharing)

All due to having a 32-bit Ubuntu installed! "uname -m" reports this as "i686" rather than "x86_64"

Saturday 8 June 2019

Getting NodeMCU working again...

In order to demonstrate these at the Senior CoderDojo I fired up the:

1) ESPlorer.jar IDE for NodeMCU.

switched to using Adruino IDE

https://www.instructables.com/id/Programming-ESP8266-ESP-12E-NodeMCU-Using-Arduino-/

In Adruino Preferences, Additional Board Managers URLs box enter
http://arduino.esp8266.com/stable/package_esp8266com_index.json,https://dl.espressif.com/dl/package_esp32_index.json

and then update button in Tools > Board Manger (search for 8266)

Should then be able to select the 8266 board > "Node MCU 1.0 (ESP-12E Module)"

Worked briefly until it flashed device!


#define LedPin D0

// the setup function runs once when you press reset or power the board
void setup() {
  // initialize digital pin LED_BUILTIN as an output.
  pinMode(LedPin, OUTPUT);
}

// the loop function runs over and over again forever
void loop() {
  digitalWrite(LedPin, HIGH);   // turn the LED on (HIGH is the voltage level)
  delay(1000);                       // wait for a second
  digitalWrite(LedPin, LOW);    // turn the LED off by making the voltage LOW
  delay(1000);                       // wait for a second
}


Sketch uses 257712 bytes (24%) of program storage space. Maximum is 1044464 bytes.
Global variables use 26572 bytes (32%) of dynamic memory, leaving 55348 bytes for local variables. Maximum is 81920 bytes.
esptool.py v2.6
2.6
esptool.py v2.6
Serial port COM10
Connecting....
Chip is ESP8266EX
Features: WiFi
MAC: ec:fa:bc:28:71:df
Uploading stub...
Running stub...
Stub running...
Configuring flash size...
Auto-detected Flash size: 4MB
Compressed 261872 bytes to 191272...

Writing at 0x00000000... (8 %)
Writing at 0x00004000... (16 %)
Writing at 0x00008000... (25 %)
Writing at 0x0000c000... (33 %)
Writing at 0x00010000... (41 %)
Writing at 0x00014000... (50 %)
Writing at 0x00018000... (58 %)
Writing at 0x0001c000... (66 %)
Writing at 0x00020000... (75 %)
Writing at 0x00024000... (83 %)
Writing at 0x00028000... (91 %)
Writing at 0x0002c000... (100 %)
Wrote 261872 bytes (191272 compressed) at 0x00000000 in 16.9 seconds (effective 124.2 kbit/s)...
Hash of data verified.

Leaving...
Hard resetting via RTS pin...


You need to press RST button on board to run the program..

These projects saved to C:\Users\kilnageer\Documents\CoderDojo\2018 Reboot\NodeMcu on my laptop along with screenshots.

Next tried the WifiClient example and got:

Connecting to vodafone-2124
.....
WiFi connected
IP address:
192.168.1.115
connecting to djxmmx.net:17
sending data to server
receiving from remote server
"When a stupid man is doing something he is ashamed of, he always declares
 that it is his duty." George Bernard Shaw (1856-1950)


So all working great next to add DHT11 sensor code and MQTT client publishing!

MQTT worked great! Checked using MQTT FX app on laptop


Next to DHT11/22 code..

15.7/15.9 C at 12:25pm

1. Open your Arduino IDE and go to Sketch Include Library > Manage Libraries. The Library Manager should open.
2. Search for “DHT” on the Search box and install the DHT library from Adafruit.


Getting ShrimpKit working again..

The ShrimpKit are great single chip based prototyping kits that can be programmed using the Adruino IDE.

http://start.shrimping.it/kit/shrimp.html


I started using them years ago in CoderDojo and then stuffed them in boxes. So they all need a bit of TLC to get their flashing LED projects working again for the Senior CoderDojo in Shannon Library this afternoon :)

First lets check the wiring. By step through these pages and comparing to the boards actual wiring.
http://start.shrimping.it/project/blink/build.html

Also ensure Adruino IDE is setup correctly:
http://start.shrimping.it/project/shrimp/program.html

Steps to get control of them!
1) Launch Adruino 1.8.8 IDE.
(Hah! As soon as I plugged one it it started to transmit "helo world" endlessly to the laptop stopping me from doing anything else!)
2) Select: Tools > Boards -> "Adruino/Genuino Uno"
3) Open the Flashing LED example project: File > Examples > 01.Basics > Blink
4) Plug in the Shrimp Kit into a USB port and select its COM port (e.g. COM6 check using Device Manager)
5) Compile and download the Blink sketch program to the Shrimp kit: Sketch > Upload (or hit Ctrl-U)
6) The red LED should now be blinking! :)

Got two breadboards working at the library.


Friday 7 June 2019

LoRa WiFi Testing got as far as 400m across Shannon Town

Received my two LoRa OLED transceivers today and I'm now working through the project at:
https://hackaday.io/project/26991-esp32-board-wifi-lora-32


My aim is to send messages between the two boards over a 1km line of sight.

So fired up the Adruino 1.8.8 IDE on my Windows 10 laptop and selected Sketch > Include Library > Manage Libraries and search for “Wifi_LoRa_32“. Selected the "Heltec ESP32 Dev-Boards"  and installed it.
https://github.com/HelTecAutomation/Heltec_ESP32

After this I could Tools >

Downloaded ESP32-DrawLogo.ino to C:\Users\kilnageer\Documents\Arduino and loaded it.

But found that they transceiver test code in already so can test as soon as powered up! :)

https://randomnerdtutorials.com/installing-the-esp32-board-in-arduino-ide-windows-instructions/

Once "esp32" by Expessif Systems installed under Boards Manager

Wow! Built-in firmware works fine!


Just powered by laptop USB ports. Then moved one transceiver as far as the library (400m) still worked! That's from inside one building to inside another building across a town! So with a roof mounted antenna at home and the other transceiver at the allotment (1500m) it might still just work.


Successfully download WiFi_LoRa_32FactoryTest sketch and works the same as the shipped firmware. Happy days :)

Can park this up for now then.