Saturday, 8 March 2025

Kitronik Autonomous Robotics Platform programming using the Arduino IDE

This very capable platform is programmed using MicroPython and Thonny on the Kitronik website

https://kitronik.co.uk/products/5335-autonomous-robotics-platform-for-pico


For example:

https://kitronik.co.uk/blogs/resources/online-tutorial-autonomous-robotics-platform-pico-buzzer-button-lights


So how can we use this information to program it using the Arduino IDE ?


Programming a Pico W from the Arduino IDE

This blog describes how to set up the Arduino IDE to program the Raspberry Pi Pico W (aka Pi Cow).

It is based on the excellent YouTube video by DroneBot Workshop: https://www.youtube.com/watch?v=yatxW3tMhRg

I am using a laptop with Mint installed and 

coderdojo@rhubarb:~/Downloads$ cat /etc/debian_version 

trixie/sid

coderdojo@rhubarb:~/Downloads$ uname -a

Linux rhubarb 6.8.0-54-generic #56-Ubuntu SMP PREEMPT_DYNAMIC Sat Feb  8 00:37:57 UTC 2025 x86_64 x86_64 x86_64 GNU/Linux

coderdojo@rhubarb:~/Downloads$ 

coderdojo@rhubarb:~/Downloads$ ls -al arduino-ide_2.3.4_Linux_64bit.AppImage 

-rwxrwxr-x 1 coderdojo coderdojo 191539050 Feb 18 22:32 arduino-ide_2.3.4_Linux_64bit.AppImage

coderdojo@rhubarb:~/Downloads$ 

coderdojo@rhubarb:~/Downloads$ date

Sat 08 Mar 2025 19:03:48 GMT

coderdojo@rhubarb:~/Downloads$ 

So let's launch that Arduino 2.3.4 IDE app image..


And install the boards manager. Go to https://github.com/earlephilhower/arduino-pico for this which explains that you need to add:
https://github.com/earlephilhower/arduino-pico/releases/download/global/package_rp2040_index.json
to your preferences


Then search for "pico" in the Board Manager and install his code.. (at the time of writing this was version 4.4.4)


Then plug in the Pico W to the USB port of the laptop and in the IDE select the pico W board and its port


After this load the Basics => Blink sketch and download it to the board


Next try the WiFi -> ScanNetworls example sketch... It's output should be something like..


Beginning scan at 80439
Found 6 networks

                            SSID   ENC     BSSID         CH RSSI
                HUAWEI-B528-4197  WPA2 10:32:7E:84:41:97  8  -96
                       Tola Park  WPA2 48:5D:35:F6:D1:AA  6  -48
                 Tola Park Guest  WPA2 4A:5D:35:F6:D1:AA  6  -42
                       VM8293952  AUTO 68:02:B8:19:EC:33  1  -98
                 Horizon Wi-Free  WPA2 6A:02:A8:19:EC:33  1  -97
                       coderdojo   WPA DC:A6:32:2A:1D:52 13  -45

--- Sleeping ---


So next is to access the Kitronik onboard sensors and controls for their Autonomous Robotics Platform

https://kitronik.co.uk/products/5335-autonomous-robotics-platform-for-pico


Friday, 17 January 2025

How to use Cloud variables in Scratch

I want to use a Python API to access read/write) variables that have been crated as cloud variables in a Scratch Project.

https://scratch.mit.edu/projects/1121119162/editor/


As this wasn't working I thought I'd first try it between two "scratcher" users. That is, "kilnageer" (my main username) and my test account "shannoncoder1001"


At present, kilnageer can create cloud variabled but shannoncoder1001 isn't a scratcher yest so I cannot test it accessing them.


Also, kilnageer  cannot list its cloud variables for the "moving dinosaur" project.


So three problems at present (Fri 17th Jan 2025 15:39)


Friday, 12 May 2023

Final sessions before Summer 2023 break will be using App Inventor

App Inventor is a brilliant free, online portal from MIT to allow people to make Android apps.

You register and sign in at: http://ai2.appinventor.mit.edu/

I have been using it for a few years and have lots of coding examples.

Tomorrow's sessions with be examining the "Don't Shake Me" app.


Above is the "Designer" view and below is the "Blocks" view:


It works by adding the AccelerometerSensor from Sensors and TextToSpeech from Media

I connect to and Android phone using a 4G GSM connection and running the AI Companion App (which must be installed on the phone) to scan the QR code presented by App Inventor screen.

When the app is run on the phone it will say "Stop Shaking Me" whenever the phone is shook

Here's it in use:

https://youtu.be/p08pQqWouBg


Sunday, 7 May 2023

Kitronix Two Wheeled MOVE: Buggy Micro:Bit Code

I thought I'd document how to code the Kitronix Two Wheeled MOVE: buggy in Micro:bit.
https://kitronik.co.uk/products/5652-move-mini-mk2-buggy-kit-excl-microbit


Here's a picture of the receiver code that runs on the buggy:


It operates by listening on radio group 1 for a number from 0 to 4. These represent the commands: STOP, TURN_RIGHT, TURN_LEFT, GO_FORWARDS and GO_BACKWARDS.

The code is also available at: https://makecode.microbit.org/_ekWCkL5H6JvY

And the hex file at: https://drive.google.com/file/d/1iK9lTVpczdeoaCo-ud3FbashRBOD7bxc/view?usp=sharing

By pressing button A the radio group can be incremented. An example of frequency hoping to stop many default transmitters controlling the buggy at once on group 1. Some interesting reading here: https://en.wikipedia.org/wiki/Hedy_Lamarr

The above code also illustrates to students the use of capitals for constants (i.e TURN_LEFT represents the number 1 and saves you having to remember this

It also makes paramaterised function calls.

NOTE: You need to add the Neopixel and Kitronix Buggy extensions to the editor


The transmitter code makes use of the accelerometer on the Micro:bit to allow for control of the buggy by tilting the Micro:bit in your hand,

Here's its code:


It doesn't require any Micro:bit extensions to be loaded. It's code is available at: https://makecode.microbit.org/_5LU5ateMM3Ru

And at: https://drive.google.com/file/d/14RTpUGfLKy_Y-GtDkIxWoT1wiVrsHF9b/view?usp=sharing


Sunday, 17 April 2022

Camera PIR Triggering

My RPiZ based backyard camera (192.168.3.18) is now triggered by Zigbee PIR sensors.

These send status messages to the Sonoff Zigbee Bridge (192.168.3.14 running Tasmota) which then publishes them to my MQTT Broker (running on a RPi4 192.168.3.6).

A Node-Red instance (running on a different RPi4 192.168.3.7) then parses these messages and if it is a motion ON (rather than OFF) message it causes a file to be created on its RPi4.

The RPiZ is checks for this file every second and takes a MOTION photo if it exists and after 5 minutes takes a TIMER photo anyway. It's using the following Bash script:

pi@tola-rpiz-noir-camera:~ $ vim ./camera.sh
pi@tola-rpiz-noir-camera:~ $
pi@tola-rpiz-noir-camera:~ $ sudo systemctl restart cameraStillCapture.service
pi@tola-rpiz-noir-camera:~ $ sudo systemctl status cameraStillCapture.service
● cameraStillCapture.service - Camera Still Capture
   Loaded: loaded (/etc/systemd/system/cameraStillCapture.service; enabled; vendor preset: enabled)
   Active: active (running) since Sun 2022-04-17 10:21:14 BST; 2s ago
 Main PID: 7234 (camera.sh)
   CGroup: /system.slice/cameraStillCapture.service
           ├─7234 /bin/bash /home/pi/camera.sh
           └─7242 ssh pi@192.168.3.7 ls -al /home/pi/takePhoto.txt
Apr 17 10:21:14 tola-rpiz-noir-camera systemd[1]: Started Camera Still Capture.
Apr 17 10:21:15 tola-rpiz-noir-camera camera.sh[7234]: ls: cannot access '/home/pi/takePhoto.txt': No such file or
pi@tola-rpiz-noir-camera:~ $ cat camera.sh
#!/bin/bash
counter=500
RESP2="TIMER"
while :
do
  #echo $counter
  if [ $counter -gt 312 ]; then
    raspistill -rot 90 -o /home/pi/backdoorRAW.jpg
    convert /home/pi/backdoorRAW.jpg  -fill white  -undercolor '#00000080' -gravity North -pointsize 64 -annotate +5+5 $RESP2" $(date) " /home/pi/backdoor.jpg
    RESP2="TIMER"
    sudo cp /home/pi/backdoor*.jpg /var/www/html/
    scp /home/pi/backdoor.jpg pi@192.168.3.6:/home/pi
    counter=0
    #echo RESET $counter
  fi
  RESP=$(ssh pi@192.168.3.7 "ls -al /home/pi/takePhoto.txt")
  # If empty then file didn't exist and error stream message produced
  # i.e. ls: Cannot access xxxxx No such file...
  #echo $RESP
  SUB='takePhoto'
  #echo $SUB
  if [ $(grep -c "$SUB" <<< "$RESP") -eq 1 ]; then
          #echo "There"
          counter=1000
          RESP2=$(ssh pi@192.168.3.7 "cat /home/pi/takePhoto.txt")
          echo $RESP2
          RESP3=$(ssh pi@192.168.3.7 "rm /home/pi/takePhoto.txt")
  #else
          #echo "Not There"
  fi
  #sleep 312
  sleep 1
  counter=$((counter+1))
done
pi@tola-rpiz-noir-camera:~ $ date
Sun Apr 17 10:21:26 BST 2022
pi@tola-rpiz-noir-camera:~ $


I had to speed up the make movies script to catch the rapidly changin MOTION images (TIMER images only change every 5 mins)


pi@tola-smarthome-v3:~ $
pi@tola-smarthome-v3:~ $ cat makeMovies.sh
#!/bin/bash
echo "" > oldCottage.jpg
lastCottageSum=$(sum oldCottage.jpg   | cut -c1-6)
cottageCounter=0
echo "" > oldExtension.jpg
lastExtensionSum=$(sum oldExtension.jpg | cut -c1-6)
extensionCounter=0
echo "" > oldFrontgarden.jpg
lastFrontgardenSum=$(sum oldFrontgarden.jpg | cut -c1-6)
frontgardenCounter=0
echo "" > oldBackdoor.jpg
lastBackdoorSum=$(sum oldBackdoor.jpg | cut -c1-6)
backdoorCounter=0
lastDate=$(date -I)

while :
do
    cottageSum=$(sum cottage.jpg   | cut -c1-6)
    if [ $cottageSum -ne $lastCottageSum ]
    then
        echo $(date) cottage $cottageSum $lastCottageSum
        lastCottageSum=$cottageSum
        cottageCounter=$((cottageCounter+1))
        #cp cottage.jpg cottageM$cottageCounter.jpg
        cp cottage.jpg cottageM$(printf %04d $cottageCounter).jpg
    fi
    extensionSum=$(sum extension.jpg | cut -c1-6)
    if [ $extensionSum -ne $lastExtensionSum ]
    then
        echo $(date) extension $extensionSum $lastExtensionSum
        lastExtensionSum=$extensionSum
        extensionCounter=$((extensionCounter+1))
        #cp extension.jpg extensionM$extensionCounter.jpg
        cp extension.jpg extensionM$(printf %04d $extensionCounter).jpg
    fi
    frontgardenSum=$(sum frontgarden.jpg | cut -c1-6)
    if [ $frontgardenSum -ne $lastFrontgardenSum ]
    then
        echo $(date) frontgarden $frontgardenSum $lastFrontgardenSum
        lastFrontgardenSum=$frontgardenSum
        frontgardenCounter=$((frontgardenCounter+1))
        #cp frontgarden.jpg frontgardenM$frontgardenCounter.jpg
        cp frontgarden.jpg frontgardenM$(printf %04d $frontgardenCounter).jpg
    fi
    backdoorSum=$(sum backdoor.jpg | cut -c1-6)
    if [ $backdoorSum -ne $lastBackdoorSum ]
    then
        echo $(date) backdoor $backdoorSum $lastBackdoorSum
        lastBackdoorSum=$backdoorSum
        backdoorCounter=$((backdoorCounter+1))
        #cp backdoor.jpg backdoorM$backdoorCounter.jpg
        cp backdoor.jpg backdoorM$(printf %04d $backdoorCounter).jpg
    fi
    date=$(date -I)
    if [ $date != $lastDate ]
    then
        echo $(date) date $date $lastDate
        mkdir $lastDate
        mv frontroomM* $lastDate
        frontroomCounter=0
        mv cottageM* $lastDate
        cottageCounter=0
        mv frontgardenM* $lastDate
        frontgardenCounter=0
        mv backdoorM* $lastDate
        backdoorCounter=0
        lastDate=$date
    fi
    echo $(date) cottage $cottageSum $lastCottageSum
    echo $(date) extension $extensionSum $lastExtensionSum
    echo $(date) frontgarden $frontgardenSum $lastFrontgardenSum
    echo $(date) backdoor $backdoorSum $lastBackdoorSum
    # Need to be quicker to catch MOTION rather than TIMER images
    #sleep 60
    sleep 5
done
pi@tola-smarthome-v3:~ $ date
Sun 17 Apr 11:37:11 BST 2022
pi@tola-smarthome-v3:~ $ df -m .
Filesystem     1M-blocks  Used Available Use% Mounted on
/dev/root          14668 10114      3926  73% /


Above script is a work in progress :)


Sunday, 29 November 2020

Kitronix line following buggy

Finally made som,e definitive code for the Kitronix line following buggy.

Things I learnt: 

1) Need 2A battery! A 1A 5V power pack can go into reset 

2) Sensor board not great


The .HEX files on Google Drive below need to be downloaded and then imported into the BBC Micro:bit web editor at: 

Micro:bit Editor


 HOW TO USE.txt

 Buggy Code (with local and remote test mode)

Transmitter Code


Programming the BBC Micro:bit in C

Finding the black line following buggy feedback loop being too slow (~ 0.5s) I decided to program it in C by following this article: https://www.i-programmer.info/programming/hardware/9651-getting-started-with-cc-on-the-microbit.html And going on to website: https://www.mbed.com/ In particular: https://os.mbed.com/platforms/Microbit/ and: https://os.mbed.com/platforms/Microbit/#getting-started-video Found I already had and account and had programmed Hello World before! Back in 14th April 2020 So looked for buggy example code: https://os.mbed.com/users/AdrianClarke/code/microbit_Buggy_Basics/docs/tip/

Friday, 3 January 2020

Getting the Kitronik :MOVE mini robot and Robot Arm working

Today I thought I'd finally get the robot arm - which I built some months ago - working.

A few weeks back I got the :MOVE robot controlled by a Micro:bit using tilt controls (an excellent suggestion made by one of the Ninjas) so I will build on this code for the robot arm.

However, the :MOVE mini only has two servos to control (one for each wheel) which can be each be forward/off/back.

Whereas the robot arm has a servo for each of its four joints. So twice as much to control.

Let's look at the :MOVE set up in move detail. It comprises of two Micro:bits:

Receiver: this is a radio receiver and is wired to the two motor servos which it controls. This was all supplied as  a kit by Kitronik (https://www.kitronik.co.uk/5624-move-mini-buggy-kit-excl-microbit.html) and when wired up it connects

This receiver code is available at Receiver code to use: download it to a folder and then drag this file to webpage https://makecode.microbit.org/# it will decode the hex file and show you the block code.
This code uses the ServoLite code extension blocks and more details are available here. This is because there is a Servo:Lite control board between the Micro:bit board and the two servo motors on the :MOVE mini.


Transmitter: This controls the :Move by transmitting Forward, Left, Right, Back and Stop commands based on how this Micro:bit is being held or shaken.
  • when you shake it displays O and sends the Stop command
  • when tilted towards B it displays <- and sends the Go Right command
  • when tilted towards A it displays -> and sends the Go Left command
  • when A pressed is displays ^ and sends the Go Forward command
  • when B pressed is displays v and sends the Go Back command
This transmitter code is available at Transmitter code to use: download it to a folder and then drag this file to webpage https://makecode.microbit.org/# it will decode the hex file and show you the block code.

As our robot arm has just the raw servos and no Servo:Lite controller board we need to use lower-level servo code to control its joints.

As the micro:bit cannot really supply enough power at +3v for the servos, we would ideally use a servo controller board. Like here


But if we give all four servos their own +3v supply (red wires) and just share their GND (brown wires) and control wires (orange) with the Micro:bits we should be OK.


andnd


Saturday, 28 September 2019

Second junior CoderDojo starts this afternoon

Today sees a second weekly group of 10 junior CoderDojos start.

That takes to 20 the total number of young people in Shannon who are exploring and sharing their enthusiasm for computers.

That's fantastic!

For the newbies I'll be covering the basics of Scratch over the next few weeks and illustrating the many capabilities of that language using the Spacecraft.sb3 program :)

For the more experienced people I'll be encouraging them to progress their projects with a view to either them or me presenting their work at Xmas.


Sunday, 4 August 2019

LoRa Compost temperature probe

Goal to create a LoRa based hot compost temperature probe capable of communication over a hundred meters to a Raspberry Pi computer.

To achieve this I plan to:
1) add a DS18B20 temperature/humidity probe to one of my two ESP32 LoRa modules
2) to connect the other one to my laptop.
3) to protect the probe from the 70 C temperatures


https://hackaday.io/project/27791-esp32-lora-oled-module
https://components101.com/sensors/ds18b20-temperature-sensor
https://create.arduino.cc/projecthub/TheGadgetBoy/ds18b20-digital-temperature-sensor-and-arduino-9cc806


(Sat 10/8/19 9:42am) Worked on it again last night and got it going!


I first got it going on a NodeMcu first to check the probe wiring was OK and it was great when it started to work once I shoved a wire in fully :)


The probe itself needs to take high temps > 80 C ? and be shoved 1 meter into a hot compostor for weeks on end. So I'm using plumbers QPL barrier pipe which is good to 92 C !


The NodeMCU code was based on the code at:
http://www.esp8266learning.com/wemos-mini-ds18b20-temperature-sensor-example.php and I used two 2.2K resistors in series to pull up D4 and I selected the board ""
nodeMcu_ds12b20_works_ok.ino (NOTE: "ds(33)" should be changed to "ds(D4)" in this code)

For the Heltec ESP32 LoRa board I first used the example code File > Examples > Heltec ESP32 Dev-Boards >  Factory Test > WiFi LoRa 32Factory Test and selected the board "Heltec WiFi LoRa 32(V2)" and then merged in the earlier
code resulting in the following program.
WiFi_LoRa_32FactoryTest_ds12b20_works_ok_1.ino


NOTE: I used pin 33 for the serial bus and selected it using the code:
   OneWire  ds(33);  // on pin D4 (a 4.7K resistor is necessary)

So now it works I need to refine it by:

On the Heltec probe side of things:
P1) to display temp in large font
P2) to be boxed with holes for probe and antenna sockets (all to be water proof so it can be left outside for a month)
P3) code to be made low power with one reading every 5 minutes (aim to have it last a month on same charge)
P4) add voltage monitor

On the Heltec receiver:

R1) Make it publish temps to MQTT broker

On the Node-Red
N1) have a page to monitor temp over a month
N2) Add e-mail alarms for low voltage, low temp and high temp! By publishing the Last Will and Testimony (LWT)


So let's address these one after the other :)

https://www.instructables.com/id/WiFi-Kit-32-NTP-Clock/ has an example of large fonts using the XXX library in its wifi_kit_32_ntp_clock.ino code.
#include                              <U8g2lib.h>                           // see https://github.com/olikraus/u8g2/wiki/u8g2reference
And installed library "U8g2 by Oliver" using Arduino IDE.

It should be good to go as was quoted on Heltec site: https://heltec.org/project/wifi-kit-32/

I choose the following display from the list at:
https://github.com/olikraus/u8g2/wiki/u8g2setupcpp


Had problems with LWT as MQTT broker would see a disconnect after 20 secs and publish it!

1565466723: New connection from 192.168.1.125 on port 1883.
1565466723: New client connected from 192.168.1.125 as esp8266-68:c6:3a:e9:f4:a-eb (c1, k15, u'inisfree').
1565466745: Client esp8266-68:c6:3a:e9:f4:a-eb has exceeded timeout, disconnecting.
1565466745: Socket error on client esp8266-68:c6:3a:e9:f4:a-eb, disconnecting.


So do I need to extend sockets timeouts on Rasp Pi ?


Thursday, 4 July 2019

Had to get access to serial port with new 64-bit Ubuntu 18.04 OS

1
Your user account probably doesn't have permission to use the serial port.
Two ways to address this:
  • Easiest, but not advised: Run the Arduino IDE as root (eg launch from the command line using sudo).
  • The second, more advisable way to do it is to add your user to the dialout group, which has permission to use the serial port. Use the command sudo adduser $USER dialout. You will need to log out then log back in for it to take effect though (or try this). To list groups of current user use groups or id -Gn.
Once this is done, when you select the correct serial port (as others have mentioned maybe /dev/ttyUSB0) you should be able to write, allowing you to program the Arduino.

Saturday, 22 June 2019

Installing Arduino IDE on Linux

https://askubuntu.com/questions/786367/setting-up-arduino-uno-ide-on-ubuntu

I found I couldn't download over serial port Blink example to NodeMCU

kilnageer@kilnageer-Inspiron-3537:~$ dmesg | grep tty
[    0.000000] console [tty0] enabled
[ 9640.093642] usb 1-1.4: ch341-uart converter now attached to ttyUSB0
[10666.992832] ch341-uart ttyUSB0: ch341-uart converter now disconnected from ttyUSB0


[10668.867323] usb 1-1.4: ch341-uart converter now attached to ttyUSB0
kilnageer@kilnageer-Inspiron-3537:~$ sudo adduser kilnageer dialout

Then logged out as Kilnageer and back in. Download then worked.

Had to include libraries PubSubClient for MQTT and adafruit unified sensor


https://lastminuteengineers.com/esp8266-dht11-dht22-web-server-tutorial/


http://www.steves-internet-guide.com/install-mosquitto-linux/

Installing The Mosquitto Broker

The download links and install directions for Linux are here.
I followed the install instructions for Ubuntu but they seemed to miss a few important steps. Here are the steps I used.
  • sudo apt-add-repository ppa:mosquitto-dev/mosquitto-ppa
  • sudo apt-get update
  • sudo apt-get install mosquitto
  • sudo apt-get install mosquitto-clients 

kilnageer@kilnageer-Inspiron-3537:~$ mosquitto_sub -h 192.168.1.100 -t \esp8266_2_arduino_out
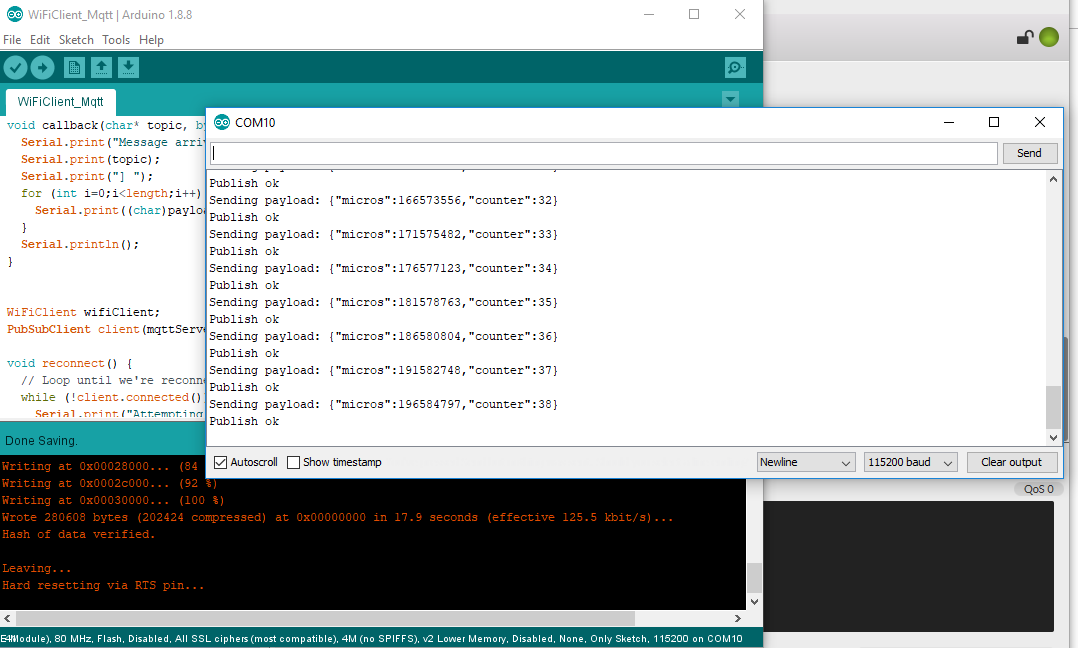
{"micros":22966832,"counter":4}
{"micros":28040128,"counter":5}


Trouble with DHT22 though DHT11 works. May use code here to investigate:
https://www.keuwl.com/electronics/rduino/bluet/08-dht11/

Rather than Adafruit uni sensor library for DHTXX.

Also .cpp code available from here:
https://www.instructables.com/id/How-to-interface-Humidity-and-Temperature-DTH11-Se/
https://drive.google.com/file/d/0B1paTI5fzcHodno5azFOSVVDT0E/view?usp=sharing


Saturday, 15 June 2019

Installing Arduino IDE on Ubuntu Linux laptop

I went to https://www.arduino.cc/en/Main/Software

and then clicked on the Linux 64-bit download link

I then saved the arduino-1.8.9-linux64.tar.xz file to my downloads directory

kilnageer@kilnageer-Inspiron-3537:~/Downloads/arduino-1.8.9$ sudo ./install.sh
(which will set up a menu item for Arduino, etc.)

Can now see "Arduino IDE" under "Programming" menu item.

But it doesn't do anything..
Trying manually..
kilnageer@kilnageer-Inspiron-3537:~/Downloads/arduino-1.8.9$ ./arduino
./arduino: line 35: /home/kilnageer/Downloads/arduino-1.8.9/java/bin/java: cannot execute binary file: Exec format error

kilnageer@kilnageer-Inspiron-3537:~/Downloads/arduino-1.8.9$ java -version
openjdk version "11.0.3" 2019-04-16
OpenJDK Runtime Environment (build 11.0.3+7-Ubuntu-1ubuntu218.04.1)
OpenJDK Server VM (build 11.0.3+7-Ubuntu-1ubuntu218.04.1, mixed mode, sharing)

All due to having a 32-bit Ubuntu installed! "uname -m" reports this as "i686" rather than "x86_64"

Saturday, 8 June 2019

Getting NodeMCU working again...

In order to demonstrate these at the Senior CoderDojo I fired up the:

1) ESPlorer.jar IDE for NodeMCU.

switched to using Adruino IDE

https://www.instructables.com/id/Programming-ESP8266-ESP-12E-NodeMCU-Using-Arduino-/

In Adruino Preferences, Additional Board Managers URLs box enter
http://arduino.esp8266.com/stable/package_esp8266com_index.json,https://dl.espressif.com/dl/package_esp32_index.json

and then update button in Tools > Board Manger (search for 8266)

Should then be able to select the 8266 board > "Node MCU 1.0 (ESP-12E Module)"

Worked briefly until it flashed device!


#define LedPin D0

// the setup function runs once when you press reset or power the board
void setup() {
  // initialize digital pin LED_BUILTIN as an output.
  pinMode(LedPin, OUTPUT);
}

// the loop function runs over and over again forever
void loop() {
  digitalWrite(LedPin, HIGH);   // turn the LED on (HIGH is the voltage level)
  delay(1000);                       // wait for a second
  digitalWrite(LedPin, LOW);    // turn the LED off by making the voltage LOW
  delay(1000);                       // wait for a second
}


Sketch uses 257712 bytes (24%) of program storage space. Maximum is 1044464 bytes.
Global variables use 26572 bytes (32%) of dynamic memory, leaving 55348 bytes for local variables. Maximum is 81920 bytes.
esptool.py v2.6
2.6
esptool.py v2.6
Serial port COM10
Connecting....
Chip is ESP8266EX
Features: WiFi
MAC: ec:fa:bc:28:71:df
Uploading stub...
Running stub...
Stub running...
Configuring flash size...
Auto-detected Flash size: 4MB
Compressed 261872 bytes to 191272...

Writing at 0x00000000... (8 %)
Writing at 0x00004000... (16 %)
Writing at 0x00008000... (25 %)
Writing at 0x0000c000... (33 %)
Writing at 0x00010000... (41 %)
Writing at 0x00014000... (50 %)
Writing at 0x00018000... (58 %)
Writing at 0x0001c000... (66 %)
Writing at 0x00020000... (75 %)
Writing at 0x00024000... (83 %)
Writing at 0x00028000... (91 %)
Writing at 0x0002c000... (100 %)
Wrote 261872 bytes (191272 compressed) at 0x00000000 in 16.9 seconds (effective 124.2 kbit/s)...
Hash of data verified.

Leaving...
Hard resetting via RTS pin...


You need to press RST button on board to run the program..

These projects saved to C:\Users\kilnageer\Documents\CoderDojo\2018 Reboot\NodeMcu on my laptop along with screenshots.

Next tried the WifiClient example and got:

Connecting to vodafone-2124
.....
WiFi connected
IP address:
192.168.1.115
connecting to djxmmx.net:17
sending data to server
receiving from remote server
"When a stupid man is doing something he is ashamed of, he always declares
 that it is his duty." George Bernard Shaw (1856-1950)


So all working great next to add DHT11 sensor code and MQTT client publishing!

MQTT worked great! Checked using MQTT FX app on laptop


Next to DHT11/22 code..

15.7/15.9 C at 12:25pm

1. Open your Arduino IDE and go to Sketch > Include Library > Manage Libraries. The Library Manager should open.
2. Search for “DHT” on the Search box and install the DHT library from Adafruit.


Getting ShrimpKit working again..

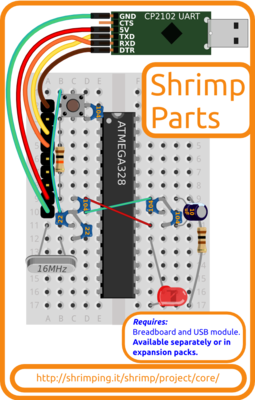
The ShrimpKit are great single chip based prototyping kits that can be programmed using the Adruino IDE.

http://start.shrimping.it/kit/shrimp.html


I started using them years ago in CoderDojo and then stuffed them in boxes. So they all need a bit of TLC to get their flashing LED projects working again for the Senior CoderDojo in Shannon Library this afternoon :)

First lets check the wiring. By step through these pages and comparing to the boards actual wiring.
http://start.shrimping.it/project/blink/build.html

Also ensure Adruino IDE is setup correctly:
http://start.shrimping.it/project/shrimp/program.html

Steps to get control of them!
1) Launch Adruino 1.8.8 IDE.
(Hah! As soon as I plugged one it it started to transmit "helo world" endlessly to the laptop stopping me from doing anything else!)
2) Select: Tools > Boards -> "Adruino/Genuino Uno"
3) Open the Flashing LED example project: File > Examples > 01.Basics > Blink
4) Plug in the Shrimp Kit into a USB port and select its COM port (e.g. COM6 check using Device Manager)
5) Compile and download the Blink sketch program to the Shrimp kit: Sketch > Upload (or hit Ctrl-U)
6) The red LED should now be blinking! :)

Got two breadboards working at the library.


Friday, 7 June 2019

LoRa WiFi Testing got as far as 400m across Shannon Town

Received my two LoRa OLED transceivers today and I'm now working through the project at:
https://hackaday.io/project/26991-esp32-board-wifi-lora-32


My aim is to send messages between the two boards over a 1km line of sight.

So fired up the Adruino 1.8.8 IDE on my Windows 10 laptop and selected Sketch > Include Library > Manage Libraries and search for “Wifi_LoRa_32“. Selected the "Heltec ESP32 Dev-Boards"  and installed it.
https://github.com/HelTecAutomation/Heltec_ESP32

After this I could Tools >

Downloaded ESP32-DrawLogo.ino to C:\Users\kilnageer\Documents\Arduino and loaded it.

But found that they transceiver test code in already so can test as soon as powered up! :)

https://randomnerdtutorials.com/installing-the-esp32-board-in-arduino-ide-windows-instructions/

Once "esp32" by Expessif Systems installed under Boards Manager

Wow! Built-in firmware works fine!


Just powered by laptop USB ports. Then moved one transceiver as far as the library (400m) still worked! That's from inside one building to inside another building across a town! So with a roof mounted antenna at home and the other transceiver at the allotment (1500m) it might still just work.


Successfully download WiFi_LoRa_32FactoryTest sketch and works the same as the shipped firmware. Happy days :)

Can park this up for now then.

Monday, 27 May 2019

Senior CoderDojo started

I started a seniors CoderDojo last Saturday in the library from 12 noon to 1 pm. This is for up to five  13 year olds and over to teach them about Adruino based electronics. They will need their own laptops.

No one has signed up yet but it is early days and I'm looking forward to letting people loose on my box for 37 sensors! :)


It's also giving me an opportunity to package up some of my electronics (Rasp Pi, NodeMCU. Shrimp kit, etc.)


Friday, 26 April 2019

Lottery Scratch program

Here's some screen shots of the lottery Scratch program I wrote a few weeks ago to decide who uses the Micro:bit kits :)

Enjoy.


Friday, 5 April 2019

Trying out the Kitronik Inventor's Kit for the BBCMicro:bit

Assembled base board and added a Micro:bit then did Experiment 1 on p 14 of the manual.
Button A displays a :) smiley face and button two displays "Hello World!". These are then jumpered to external buttons.

All OK. (I hadn't realised I only needed the battery pack for standalone mode!)